When you first install Ubuntu onto your computer, it automatically installs its own graphics drivers. If you happen to have NVIDIA graphics cards, you may in fact have to install them yourself, and it can lead you to have some problems if you do the wrong thing. This is inspired on the guidelines from Lubos Rendek on LinuxConfig.org in 2018-04-30 as it can be found here. When I followed their instructions, there were some extra steps that were not stated there and I ended up getting errors everywhere and I couldn’t log into my computer anymore. It would be stuck on the login screen. No matter how many times I entered the correct password, it would log back out, and the only way I was able to fix it was using Ctrl+Alt+F3.
Step 0: Install Timeshift in case shit happens
Timeshift is a very nice program that creates restore points in case fuck ups happen with your system. Open Terminal and run the following lines:
$ sudo apt-add-repository -y ppa:teejee2008/ppa
$ sudo apt-get update
$ sudo apt-get install timeshift
Then you can open the application and create a restore point. Just in case! :)
Step 1: Checking what Specs you have
First, let’s check the model that you have, and see which are the drivers that are recommended for you. In the website above, you may find the following example.
$ ubuntu-drivers devices
== /sys/devices/pci0000:00/0000:00:01.0/0000:01:00.0 ==
modalias : pci:v000010DEd00001180sv00001458sd0000353Cbc03sc00i00
vendor   : NVIDIA Corporation
model    : GP106 [GeForce GTX 1060 6GB]
driver   : nvidia-304 - distro non-free
driver   : nvidia-340 - distro non-free
driver   : nvidia-390 - distro non-free recommended
driver   : xserver-xorg-video-nouveau - distro free builtin

== cpu-microcode.py ==
driver   : intel-microcode - distro free
When running on my current computer (a Thinkpad P51), I get the following result:
$ ubuntu-drivers devices
== /sys/devices/pci0000:00/0000:00:01.0/0000:01:00.0 ==
modalias : pci:v000010DEd00001436sv000017AAsd0000224Dbc03sc02i00
vendor   : NVIDIA Corporation
model    : GM206GLM [Quadro M2200 Mobile]
driver   : nvidia-driver-390 - distro non-free recommended
driver   : xserver-xorg-video-nouveau - distro free builtin
From here on, I’ll follow the details of my own computer
Here, we’ve seen that this computer possesses a NVIDIA Quadro M2200 Mobile, and the recommended driver to be installed is in fact nvidia-390
Step 2: Install the drivers
From here, you may automatically install all of the drivers with the following command:
$ sudo ubuntu-drivers autoinstall
Or you may install only the driver needed, which in this case would be for the nvidia-390
$ sudo apt install nvidia-390
You’ll see that this may take a little while :)
Step 3: Reboot the System
Here, you’ll now have to reboot the computer and you may be done. If you have encrypted the Ubuntu partition, as I have, you may need some more steps. I found some help over here.
After you reboot, you may face the following screen
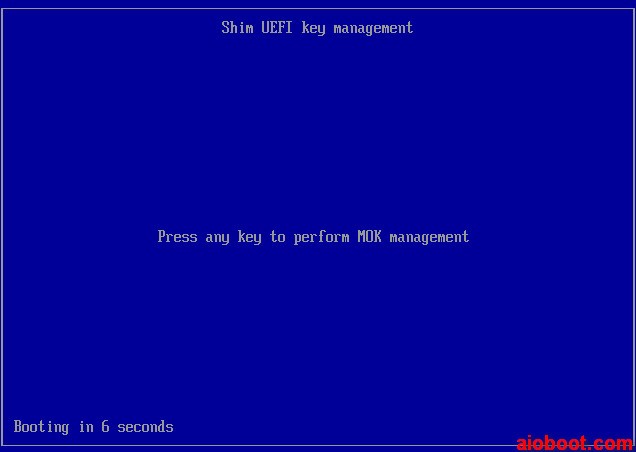
MAKE SURE TO PRESS A KEY AND DO NOT LET THE TIMER RUN OUT OTHERWISE YOU MAY ENCOUNTER THE ERROR DESCRIBED ABOVE
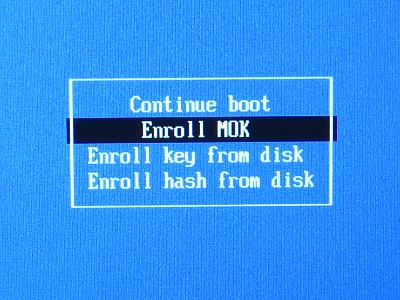
You will then see a few options
- Continue boot
- Enroll MOK
- Enroll key from disk
- Enroll hash from disk
Choose “Enroll MOK”
Next, you may choose “View key 0”, but then choose “Continue”
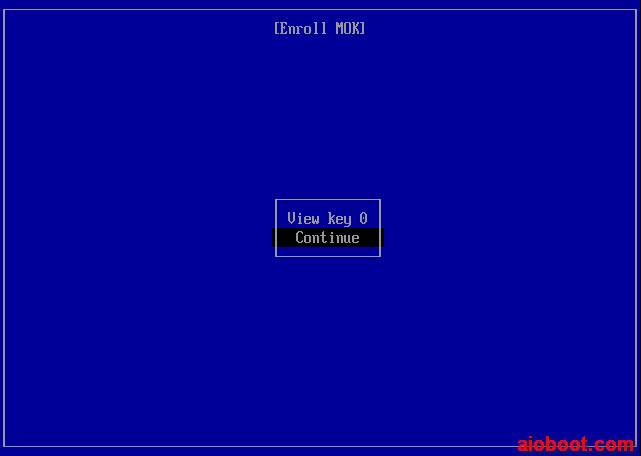
From then, you should be able to successfully login.
If things went wrong and you can’t login
If things went wrong, now we gotta fix it!
One thing that it helped people was to uninstall the NVIDIA drivers as it is shown here. In this case, enter the computer through the Terminal with Ctrl+Alt+F3 or one of the other function numbers, and login into your account. Now uninstall your drivers with
$ sudo apt-get purge nvidia*
If this still doesn’t work, assuming you’ve created a restore point, you can restore your system with Timeshift. First list your restore points, and then choose
$ timeshift --list
Device : /dev/dm-1
UUID   : d4ec6c13-ba8d-4f9a-90af-603184197a84
Path   : /
Mode   : RSYNC
Device is OK
10 snapshots, 165.4 GB free

Num     Name                 Tags  Description
------------------------------------------------------------------------------
0    >  2018-08-14_19-20-34  O
1    >  2019-01-14_13-00-11  D
2    >  2019-01-15_15-00-01  D
3    >  2019-01-16_15-00-01  D
4    >  2019-01-17_16-00-04  D
5    >  2019-01-18_11-41-45  O
6    >  2019-01-18_16-00-02  D
7    >  2019-01-20_20-02-58  D
8    >  2019-01-22_16-00-02  D
9    >  2019-01-23_00-33-04  O
Finally, you can restore it by running the following line:
$ timeshift --restore --snapshot '2019-01-23_00-33-04'
You can then try things again, if you’d like!